I’ve spent most of the past week doing pattern prep in short bursts. (In fact, I’m behind in my blogging as I type this; all this happened last weekend!)
Here’s where I’m at with each of my three projects.
McCall’s 5252 (hooded sweatshirt)
The write-ups on PatternReview.com say this pattern runs large, so I traced the Small version of the pattern and I plan to hope for the best. Unlike most other reviewers, I will be including the MP3 player pocket (hereafter referred to as the “smartphone pocket”). The front has two different pockets, side panels and a yoke front, so this pattern has eight pieces for View E.
McCall’s 6044 (button-down shirt)
Instead of tracing this pattern, I simply purchased another copy from Joann’s for 99 cents when it was on sale. I’d much rather pay a buck then spend all that time messing around with tracing paper and a Sharpie. I chose the Medium size for this pattern. I have high hopes this will fit well, based on my positive fit experience with McCall’s 2447. The good news is that View A (the short-sleeve version) has fewer pattern pieces to deal with.
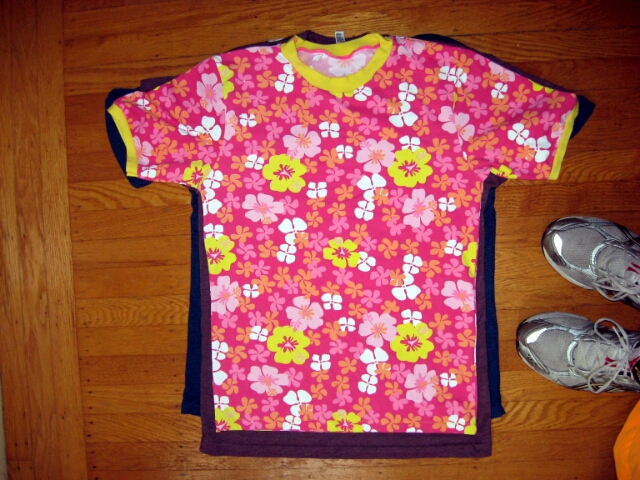
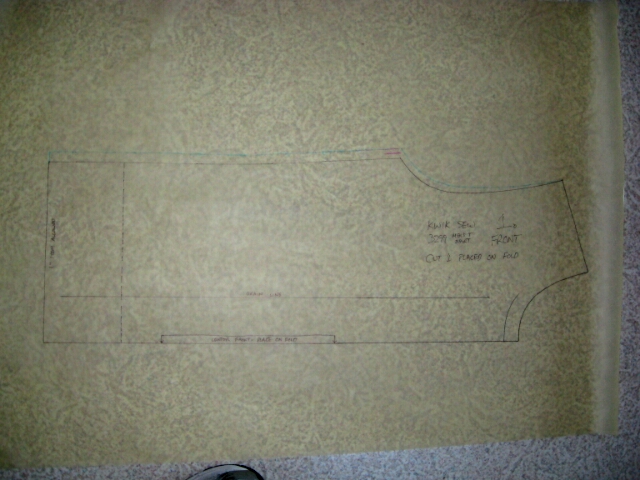
Kwik Sew 3299 (T-shirt)
Having made this pattern several times in the past, I knew I wanted to make some alterations for better fit this time around.
The very first time I sewed KS3299, I traced and cut the Medium version of this pattern. The result was huge – across the shoulders, sleeves and around the chest.

So I tried the Small version. The shoulders and sleeves fit nicely, but the chest area was too tight.


But still, it was good enough that I made a batch of shirts with this pattern. An experienced sewist friend saw me wearing those shirts and suggested the alteration. At that time I was less than six months into my sewing career and I was a little afraid to try a pattern alteration. But for this new batch my quality bar is set higher.
I compared the Small and Medium sizes of KS3299 with each other, and with a tight-fitting American Apparel size Medium T. (American Apparel is known for their close fit). KS3299 Small is not only the narrowest, it also has a taper down the sides for a narrow waist. No wonder this shirt makes me look fat.
Bottom to top: KS3299-Medium, American Apparel Medium, KS3299-Small
KS3299 Medium is about an inch wider than the Small on each side of the chest, making it about four inches larger in circumference. I rechecked the master pattern and was a bit surprised to see, indeed, this is the case:

Because the shoulders and sleeves fit well, I plan to enlarge the Small pattern rather than shrink the Medium. My first thought was to widen the side seams by 1/4 inch in both front and back for a total of 1 inch extra circumference. But after studying the shirts and pattern, I decided to widen the front and back pieces by 1/2 inch, for a total of two extra inches of circumference. This will produce a garment sized right in between the other two, which should be close to ideal.
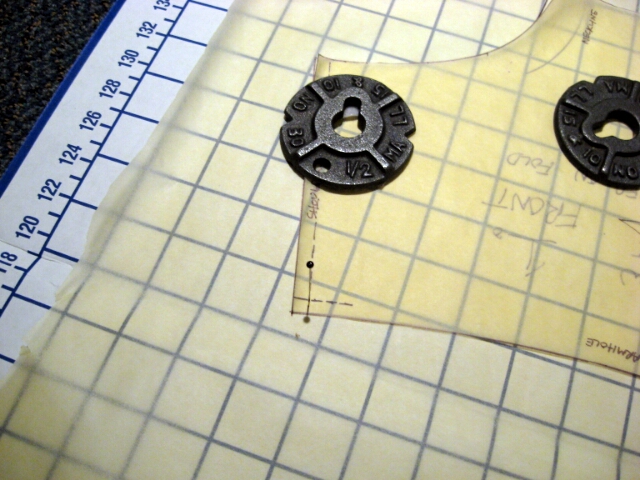
To enlarge the pattern, I used the “Pivot and Slide” approach from Nancy Zieman’s book, Pattern Fitting with Confidence. Page 20 describes this alteration as “Increasing the Bust Line”. Since I don’t have much of a bust to speak of, let’s instead say we are “Increasing Chest Width.”
First, I drew in the seam lines on my existing traces of the front and back piece. The pivot points must be at the intersection of seam lines, not the cut lines. (Kwik Sew uses a 1/4-inch seam allowance on this pattern). You’ll see the seam lines as dotted lines in the photos which follow.
(Click or tap on any of the photos for a larger version).
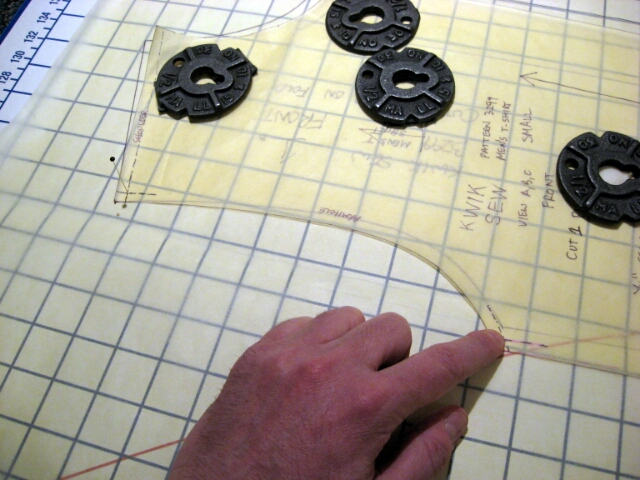
Next, I traced new front and back pieces from the master. These will become the altered pattern pieces. I’ll pivot and slide my existing traces, using them as guides to draw new lines.

On a pattern board, I positioned the older trace exactly on top of the new trace and weighed everything down to keep it from shifting.

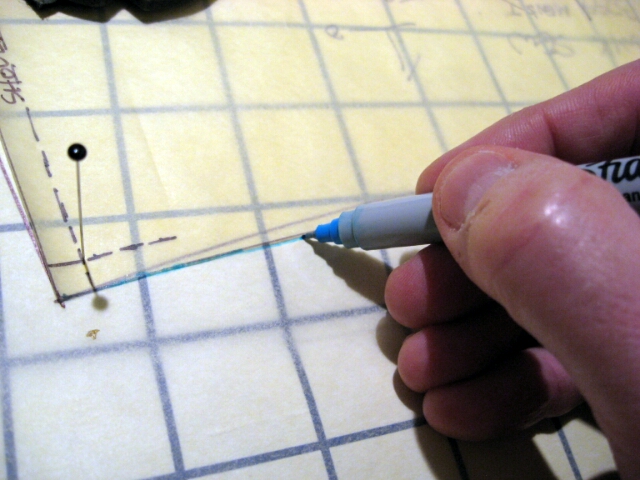
I measured 1/2 inch from the side seam edge and made a mark with magenta Sharpie.

I pinned the intersection of armscye and shoulder seam lines – the first pivot point. Then, I pivoted the top pattern to meet the magenta mark.
Then I drew in the new armscye line by tracing the old pattern piece, in light blue.
Next, I removed the pin and re-pinned the intersection of armscye and side seam lines. This became the second pivot point.

I pivoted the top piece a second time, until both pattern pieces were square with each other – in this case, the grain lines and lengthen/shorten lines for both pieces lined up with one another.

Nancy Zieman’s book pivots the top piece so as to taper into old seam line near the waist. But I’m trying to expand the width of the entire torso, not just the chest area. Squaring the top and bottom pieces produces a new side seam that is parallel to the old, but 1/2 inch farther out.

Finally, I traced the new side seam.

Here’s the finished result.
I repeated the same procedure for the back piece.
I’m anxious to actually stitch this up and see how it fits!
I like the way you show the alterations of the pattern pieces, is it possible to show the old pattern piece on top of the new pattern piece for comparison? Also the circumference needed will change with the “stretch” factor of the fabric. For your chosen fabric, you cana wrap it around yourself until you like the result, measure the amount of fabric needed for the circumference your like and check your pattern and alter it for that measurement. This is the way to customize the pattern based on fabric choice.
The final photo of the “new” pattern piece didn’t turn out that well – In the photo, the light blue outline is for the “new” piece and the black outline is the “old”. I will try to take a new before/after photo to make it more clear.
I had never thought of measuring out raw fabric to fit, then measuring and altering the pattern based on the measurements. Thank you for the suggestion!
What do you use for pattern weights? They’re so industrial and badass-looking!
Maili,
The pattern weights are “malleable washers” that I got from the hardware store. I just did a Google search on that term and found lots of them available.
I live in San Francisco, earthquake country. Typically houses are bolted to their foundation as a precaution against earthquakes. When we moved into our home, the inspector pointed out the previous occupant had drilled the holes for the bolts, but had never actually bolted the home to the foundation. The malleable washers you see in the photos are the ones left over from my home-bolting experience.