I’ll bet you’re all enjoying my pants-fitting saga so much, you’re wishing it will never end!
So I hope I don’t disappoint you by presenting the final (?) chapter in the story.
Muslin F
Picking up from Round 6, I prepared Muslin F, based on all the changes I had hacked into Muslin E. Let’s take a look.


The first thing to note is that the back is looking great – I’m quite happy with it and don’t want to tweak it any more. There’s still a bit of crumpling under the seat, but I suspect in fashion fabric it should look fine.
There is a problem with this muslin, however, and it is with the front crotch. All of a sudden, there’s a massive puddling of fabric in front, literally making pleats on itself.

This problem was caused by a mistake I had made. I had scooped out the front crotch seam by about 3/8″ to try to take in some excess fabric that’s puddling. That puts the crotch seam farther from my “anatomy”, so Sarah suggested I make a corresponding change of taking in the front inseam by 3/8″ right at the crotch point.
What I did was let out the front crotch 3/8 rather than take it in. So instead of removing 3/8″ of excess, I added another 3/8″ to the front crotch seam. This extra crotch depth caused all of the crazy pooling of fabric in front, compared with Muslin E.
Fortunately I discovered this mistake on my own, and let Sarah know about it rather than depending on her to troubleshoot the issue. Fixing this mistake (taking out just the extra 3/8″ I added) immediately had a HUGE impact on the excess fabric folding in front.
After taking in the front crotch seam another 3/8 (for a total of 3/4 inch compared to the above photos), here’s the corrected muslin F:


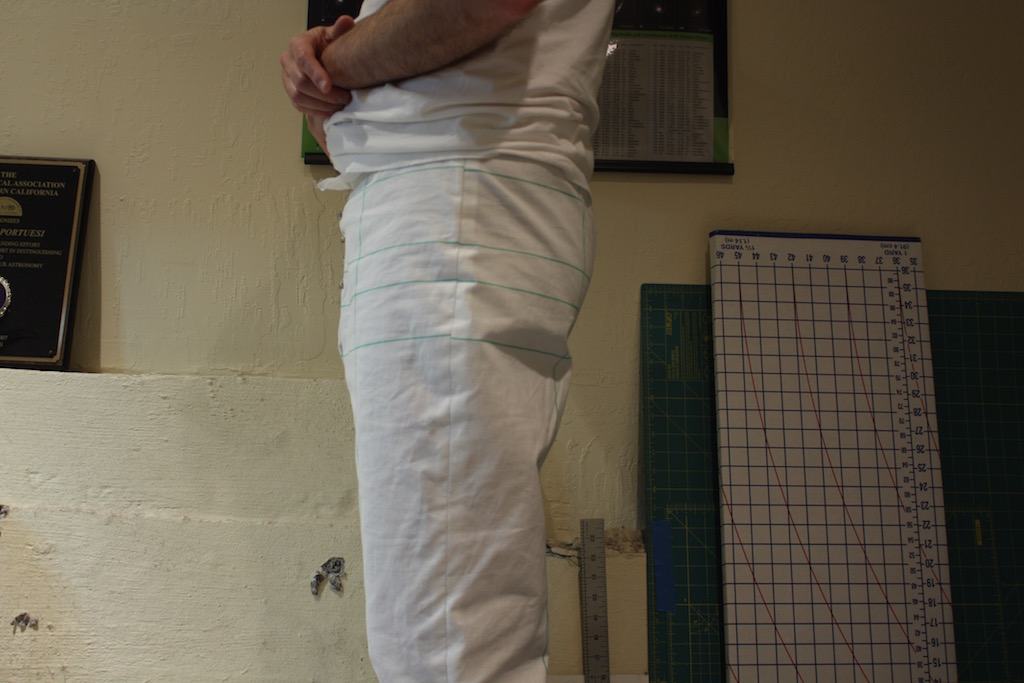

The front crotch seem is much, better. though there is still some fabric puddling in the area around the crotch point.
Side Seams and Darts
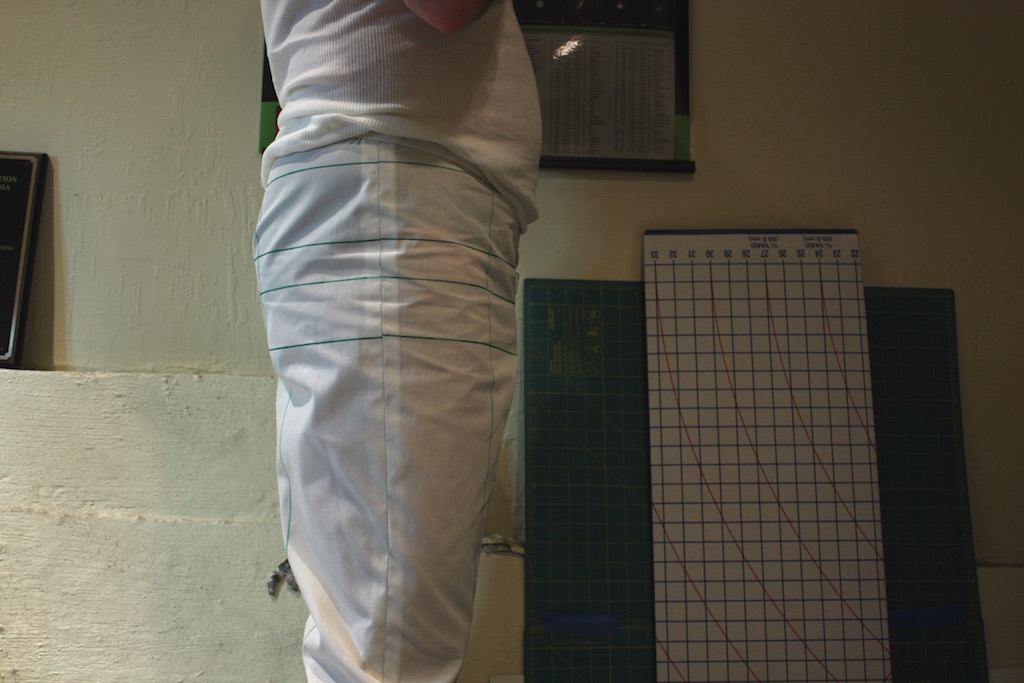
With the crotch curves finally getting under control, I pinned out a new set of darts. In the photo below, the left side has a single dart, while the right side has two darts: one directly over the high point of the seat, and a second, smaller dart close to the side seam.
My body has a hollow at the side of my buttock at hip level, partly due to a mound just below my waist and above the hip. It’s most noticeable on my right side. The smaller dart near the side seam was meant to try to get the fabric to curve nicely over that hollow; it didn’t work.

At this point, I re-watched some of the course videos on PatternReview and realized there were still some things I wanted to change. To make it educational, I sent Sarah my guesses in advance before hearing her feedback on these photos. I wanted to learn from the experience, rather than depend upon Sarah to do all the thinking for me.
- I need to work on the side seams and the darts simultaneously. In back, waist circumference will go into darts to shape the seat. But any excess circumference at the waist after the darts are shaped is more likely to come out of the side seams.
- Looking at the side seams, they are a bit too snug at the widest part of the hip, but bow out below that at the start of the thigh. It’s almost as if I need to raise the side seam curve.
- In the front, not only do the horizontal balance lines dip slightly, but the vertical lines are a little bowed out as well. I could still grab a small amount of excess fabric at the bottom of the front crotch curve, which would help the vertical lines hang straight. I wondered if the front crotch needs to be scooped just a little bit more.
The feedback I got back from Sarah confirmed most of my guesses. She advised me to scoop the front crotch a bit more, but probably only 1/8 of an inch, not more than 3/16″, and perhaps take another 1/8″ to 1/4″ from the front crotch at the inseam.
She noted that the reason why the hollow shows up in back is that the pants are too snug – adding ease at the hip should help with the issue. And she agreed that hip curve on the pants is too low relative to my actual hip. She also suggested I shorten the second dart if I decided to keep it.
But we both agreed that the pants fit well enough to start thinking about making a wearable muslin to wear on a daily basis, to evaluate how comfortable the fit is.
Muslin G
Before going to fashion fabric, I wanted to make one more muslin – Muslin G.
On this muslin, I did the following things:
- Redrew the hip curve to add some ease at the widest part of the hip.
- Scooped the front crotch another 1/8 inch.
- Took 1/8 inch from the front crotch seam, and added 1/8 inch to the back crotch seam to keep the overall crotch length even.
- Decided on a single dart, and stitched it in back. The single dart is a little longer at Sarah’s suggestion.
On this muslin, I trued the inseams and side seams, but I also trued the front and back crotch seams where they intersect at the crotch point. After drawing the crotch seams, there is often a “peak” that forms where the seams don’t exactly meet each other properly when the crotch point is stitched. Sarah was insistent that I true the seams at this point.

Also, for the side seam drafting work, I started using my metal hip curve ruler, rather than the plastic styling ruler. It is less convenient because you cannot see through it, but it is easier to draw straighter seam lines than with the plastic ruler. I found all the side seams I drew with the plastic ruler came out too curvy and jodhpur-like.

I compared the two by setting one over the other, and the plastic ruler does have almost the exact same curve over the “hip” portion of its run as does the metal one. Perhaps it is because the metal ruler has longer, straighter sections.
Here’s the fitting photos for Muslin G.


The back is just the way I want it. There are a few pull lines at the hollow in my buttocks, but it still lacks ease at the widest part of the hip. I pinched out the side seam in that area and there’s about 1 inch of circumference ease through there. That’s way too snug.
The front crotch seam remains a problem. My consultation credits with Sarah have run out, but she has offered me a parting bit of advice, that perhaps there is too much length in the crotch as it goes up the inseam, across and then back down. I will probably tackle this further down the line, but for right now it’s good enough for me.
I’m happy enough with this fit to go into a wearable muslin next. The two tweaks I will make to the pattern before making in in fashion fabric are:
- Add about an inch of ease or so at the widest part of the hip. I want it to be close-fitting, but not skin-tight.
- Adjust the leg length. The legs have become shorter due to all of my crotch adjustments moving the crotch point down the garment.
Where to from here?
Besides the last round of pattern tweaks, I need to turn this pattern from a fitting block back into a workable pants pattern. This will involve the following work:
- Mark the new waist band placement on front and back pieces
- Draft a new waistband
- Draw placement marks for the back pockets (probably welts)
- Draft new front pocket facings and fly facings
I’m hoping to use the Wild Ginger software on my computer for this work. More on this in future articles.
Reflections on the experience
I thoroughly enjoyed working with Sarah Veblen. She has a keen eye for fit. She can analyze a set of photos, assess them, then put into words the explanation for what’s wrong – even for very subtle issues – and how to fix it. To me, that’s amazing.
I was surprised by her advice at a few points along the way; when I asked the reasoning for her course of action she always would provide me with a clear explanation why she chose one path over another.
The process of sending her photos, then having an email discussion about them worked very well. The option for online video consultation was there (at additional cost), but I didn’t need it. Aside from the time Sarah spent troubleshooting the muslin, she also encouraged me to ask questions about the fitting process. This helped make the fitting a learning exercise for me, rather than just having Sarah do “fitting by remote control”.
The biggest disadvantage compared to working with a local instructor is the turnaround time for the emails. Sarah commits to responding within three business days, but usually responded within one or two (and always within three). Weekends are my free time for sewing, so if I sent her an email on a Friday or Saturday, I sometimes didn’t get a reply in time for me to act upon it that weekend.
So, why work with a remote instructor? For this fitting project, I researched quite a bit of material online and in-print. The two biggest take-aways I had from the research were:
- Every fit expert has their own methodology and approach.
- A conceptually driven approach works much better for me. If I can visualize in my head what’s going on, I can get better results than if I follow a rule-based approach (“see this wrinkle, slash the pattern that way”). Especially in pants fitting, where making one adjustment affects a bunch of other adjustments as a side-effect.
Sarah Veblen’s video course was the first I had seen that was comprehensive and really made sense to me. It is conceptually driven, but it also has an objective way to gauge your fitting progress – namely the horizontal and vertical balance lines. The value of the balance lines was really impressed on me when Sarah guided me though adjusting the back crotch by snipping and spreading the seam. I could see the effect of even a 1/8″ change to the curve by looking at how the vertical lines responded at the same horizontal level I altered the curve. At the same time, the garment fit better.
When I realized I needed help with fitting, I didn’t want to risk going to another instructor and getting advice that wasn’t compatible with a methodology that largely made sense to me. I didn’t blog about it, but in June I attended a fitting lecture by Sandra Betzina at Stonemountain & Daughter Fabrics in Berkeley. While Sandra’s methods are undoubtedly clever, any attempt I might have made to combine them with my current project would likely have ended with disaster. Sandra acknowledged during her talk that every fit expert has their own approach, and that you should find the one that works for you.
Since I had signed up for Sarah’s PatternReview course, and also purchased her book, she could make reference to the course handouts as well as the videos in order to help convey the concepts behind her suggestions. I did learn a lot about pants fitting that was not covered by the course or by the book – specifically everything having to do with the front crotch! Fitting front crotches are a difficult thing for guy sewing, it’s kind of like our version of the FBA (Full Bust Adjustment) for girls.
I did sign up for more than one consultation session to achieve my desired result. Sarah’s consulting rates are very reasonable, however, and I completely feel I got my money’s worth.
I’ve signed up for Sarah’s bodice fitting class on PatternReview, and I plan to use her fitting methodology on my next shirt-making project. I’m looking forward to finally having a TNT shirt block to work from, in addition to a pants block.
Well done – that last muslin is looking great and in fashion fabric (pressed etc.) I am sure you will be pleased with the end result.
You give me hope for being able to tweak my skinny khaki pants. I think learning from your designs and a book I have, I should be successful.
Thanks for the ruler comparison and different outcomes. That was a very informative tidbit.
3 points for using jodhpur in a sentence.
Thank you for this very informative series of posts. Even though I have slightly different fitting issues, I always have the same excess crotch fabric if I don’t remove fabric from CF tapering to the side seams. The amount varies according to the pattern from 3/8″ to 1 1/4″+.
The back is looking really good but it looks to me like the front needs to be scooped about another 1/4″ to nothing at the crotch point to get rid of those two strong vertical creases. Why not try basteing that then try the pants back on. If it doesn’t help just unpick it. Nothing lost. Good luck!
Nola,
Your advice is very similar to Sarah’s closing remarks. I’m motivated now by the desire to “not screw anything up” and also to get back to real sewing! But I really ought to give it a try on the current muslin.