It’s unfortunate that I I like plaids. I spent all of a Saturday cutting out the fabric for my Springtime Seersucker Shirt.
Some Other Ways to do Plaid Matching
It seems like there’s several methods for matching plaid patterns, so that the pieces nicely match each other at the seams in the finished garment. No matter the approach, all of them have to work at the cutting stage. Once the pieces are cut, the way they will match each other in the finished garment has already been determined.
Tasia at the Sewaholic Blog offers this tutorial for matching plaids, which is well worth reading. Her approach has two major steps: first, you fold the fabric, then align and pin the two sides together at each repeat point of the pattern. Secondly, you mark the pattern piece, with pencil, where the pattern lines fall on a pattern piece. You extend those lines onto the adjoining pattern piece, then use that as a guide for cutting out the subsequent pieces.
I kind of like this approach – it’s pretty simple to follow. But it’s also a lot of pinning, since you end up pinning the fabric everywhere, then pinning the pattern piece to the fabric. And I’m not sure what you do when the fabric anchoring pins fall on the cut lines of your pattern pieces. I guess you have to carefully remove them so you don’t cut over them, and it’s even more work.
The Reader’s Digest New Complete Guide To Sewing offers a really thorough discussion of this topic. Also, I found some really helpful hints in the book How to Use, Adapt, and Design Sewing Patterns by Lee Hollahan, which I checked out from the library. My method for handling patch pockets came from this book.
How I do Plaid Matching
I sort of invented this plaid-matching approach after looking at the references I listed above, and making things up. It’s a work in progress.
Mark Seam Lines
Because garment pieces join each other at the seam lines, that’s where you should focus on matching them. This is vitally important if you want to continue a plaid pattern across the parallel of a seam, as the seam allowance doesn’t show up in the final garment:
To match stripes which lie perpendicular to the seam, you don’t necessarily need to do it right at the seam line:

Matching features which run horizontal to a seam are less critical to being matched at the seam line.
Multi-sized patterns
I use mostly multi-size patterns, which have cutting lines for the various sizes, but omit seam lines. So I marked the seam lines on the cut pattern pieces, using the seam gauge to measure the 5/8 inch seam allowance. It’s not really necessary to mark the seam lines across the entire pattern. I marked it along straightedges, and where one seam line intersects another.
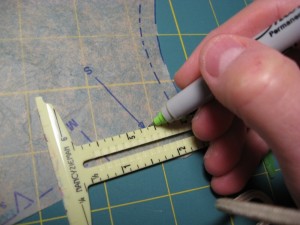
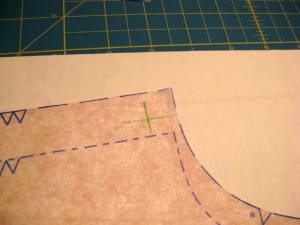
Intersection points
For the shirt, I marked the intersection of seam lines on following pieces:
- Front: Along front band, intersection of armscye at shoulder and armscye at front side seam, shoulder at neckline, side seam at bottom hem.
- Back: At the intersection of armscye with shoulders and side seam, and side seam at bottom hem. (The straight edge is not marked because the center back has no seam; the edge is normally placed along a fold during cutting).
- Sleeve: Intersection of sleeve seam at armscye seam.
- Pocket, collars, collar stand: I’ll cover these shortly.
Straighten the Fabric
Next, I laid the fabric out flat on the cutting surface, and straightened it to ensure the plaid lines were as straight as possible. I did not fold the fabric. Instead, I cut out two separate copies of pieces like sleeves, flipping the pattern piece so the second copy was a reflection of the first. This way, I never had to spend time pinning the raw fabric to itself.
I used my transparent quilting ruler to make sure the fabric was lying on the board free of distortion.
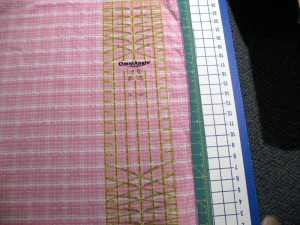
I spot-checked with the ruler at various places on the cutting table. Most important is the area where you will position and cut the next pattern piece.
After straightening the fabric, you could pin it to a pattern board, to help preserve the straightness while cutting. I didn’t need to do this, but you might find it helpful.
Position the Pattern Pieces
To position the pattern pieces, I first picked out a distinctive feature on the fabric – say, a colored stripe or rectangle – and decided where that should appear relative to the design features of the shirt. I chose both horizontal and vertical fabric features, to align both horizontally and vertically.
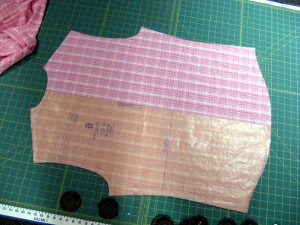
For my shirt, I began with the left front piece. I decided a long, dark pink stripe should run just on the edge of the front band (placket), and another dark pink strip should just touch the top of the shoulder at the neckline. I positioned the pattern piece so the seam lines ran just next to these features.

On the shirt front band, a large pink stripe is positioned just along the seam line (in green) and outside the seam allowance, so it will be visible on the finished shirt.
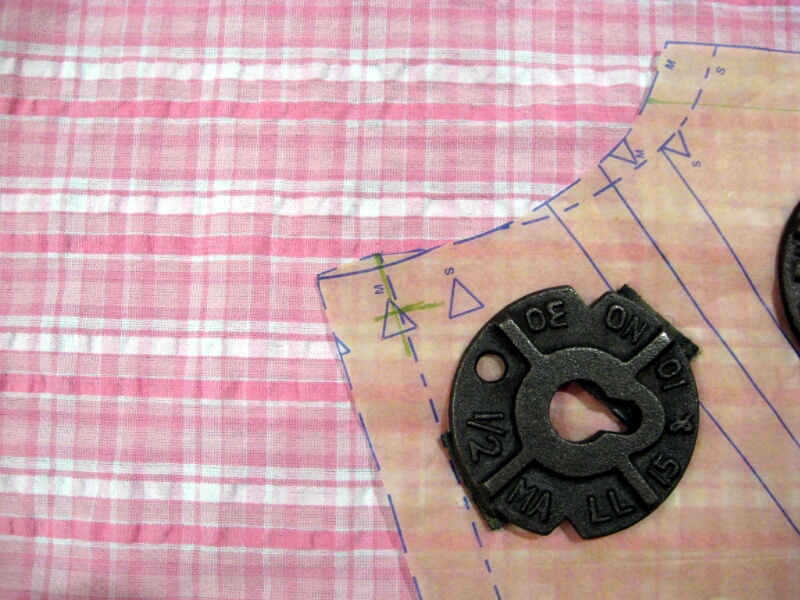
Another (horizontal) large pink stripe is positioned to hit the top of the shoulder at the neckline.
I also ensured the grain lines of the pattern and fabric lined up with one another, and double-checked that the plaid lines on the fabric were still straight.
Record Matching Points During Cutting
Once you have placed the pattern piece so the fabric lines up with your favorite design features, your choices determine where the fabric is placed on the other seam lines of your pattern.
I used a digital camera to take closeup pictures of where the plaid lines line up with all the seam intersections, as well as pattern notches and other features marked on the pattern.
When I cut subsequent pattern pieces, I referred back to the photos to make each pattern piece correspond with the previous pattern pieces at the seam intersections and pattern notches. Sometimes I lined up horizontal stripes so they happen at the same relative place on the new piece. And sometimes I line up vertical stripes so a pattern will continue uninterrupted on either side of a seam, for example.
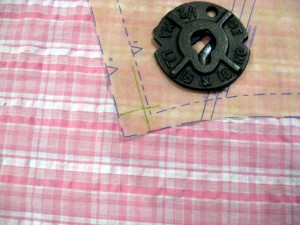
Photo showing where fabric design meets with shoulder/armscye seam, as well as pattern notches on shoulder.
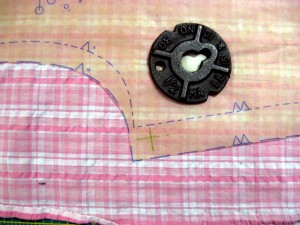
Where fabric meets up with the armscye/side seam, also where design meets pattern notches.
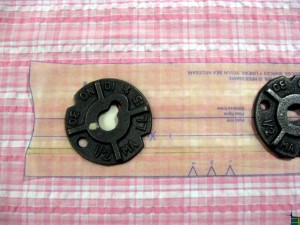
Laying out the left side shirt front band. The large pink band runs just *inside* the seam allowance. When the seam is stitched, the vertical features will continue evenly from the front, across the seamline, and onto the band.
Cutting Back and Other Folded Pieces
To cut out the back piece, and other pattern pieces that are normally placed on the fold, I simply placed the pattern piece for one half, cut it with the rotary cutter, then flipped the pattern piece over and cut the other half.
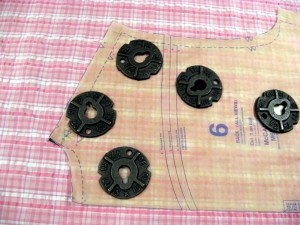
Positioning the first half of the back. Large pink line hits top of shoulder, large pink line along the center line of the back piece.
After cutting the first side, flip the pattern piece and cut the other side.
Pockets
I handled pockets using a method adapted from Lee Hollahan’s book, listed above.
While cutting the left front shirt piece, I positioned the pocket pattern piece where it will be attached, matching pattern symbols. I then made small marks, with a sharpie, on the pocket pattern piece indicating where the notable plaid lines (in my case the heavy pink stripes) line up with the edges of the pocket.

Green tick marks mark where the pocket lines up with the bold pink lines, when the pocket is positioned on the shirt front.
Finally, I place the marked pocket pattern piece against the raw fabric, lining the fabric lines with the pencil marks, and cut.
Collars and Collar Stand
Matching the collars and collar stand pieces is pretty easy. They are cut on the grain along an axis perpendicular to the rest of the shirt, and so only the vertical features need to be matched. I lined up the center line of these pieces with whatever line of the fabric was positioned along the center line of the shirt back.

The collar and collar stand line up with the bold pink stripe along the garment centerline. This will make the collar design line up vertically with the back of the shirt.
Keeping Pieces Aligned During Sewing
It’s not enough to get the pieces cut so they match properly. They also have to be kept in alignment while stitching the seams.
This time, I tried the walking foot to keep plaids matched. The walking foot evenly feeds fabric on both the top and bottom layers, which helps keep the layers matched.
Results
How did it turn out in the finished shirt? Not perfect, but not bad either.
Side Seams
The side seams involve mainly matching horizontal features.
Because the side seam is curved, vertical features simply will move in and out of the seam. The horizontal features matched up very well, though the large pink lines sometimes didn’t match perfectly at a few points along the seam. This despite pinning the fabric before stitching and using the walking foot.
Shoulders
Shoulders are a mixed bag. The left-hand shoulder was a dead-on match of the vertical features with the back side:
whereas the right-hand shoulder was off.
I think this was because I was trying too hard to continue the vertical features from the left front side, across the front band, to the right side of the shirt when I was laying out the right-hand front piece. I should have matched the vertical shoulder stripes instead.
Front Band
The front band matched nicely on both left and right sides.
What didn’t turn out perfectly was the continuation of the vertical features across the center line of the shirt. When the shirt is buttoned, there’s a repeat of the vertical white stripe rather than a nice continuation of the pattern:
Again, if I had matched both fronts vertically at the shoulder line, then matched the front band vertically to the fronts, I’m pretty sure everything would have turned out perfectly. Something to try next time.
The pocket turned out terrific, though truth be told, the pocket is probably one of the easiest things to get right. You can tweak the positioning so that the plaids line up every time. The initial pattern layout/cutting work is to make sure you don’t have to tweak the placement much.
Collar
Since the collar is cut perpendicular to the other pieces, we just match one feature – the pink stripe at center. That went well.
Conclusion
My skills at plaid-matching are definitely a work-in-progress. I may revisit this blog post in the future with a followup, with more specific suggestions for matching at tricky spots like front band closures/flys, shoulders and sleeves.
Even though this shirt didn’t turn out perfect, the plaids match much better than those on a commercially made Ben Sherman shirt in my collection.
And finally, I’ll close with a bit that I learned from Brian at the BrianSews blog: when it comes to matching plaids, it’s the thought that counts. If you make the effort to do the matching, even if it doesn’t quite perfectly match, your eye is very forgiving and will overlook those imperfections.


Pattern matching sounds like a lot of work. I like your pattern weights.
The pattern weights are malleable washers. They are used to bolt down my house to its foundation, for earthquake safety! The ones I’m using are the leftovers.