Last time, I got started on fitting myself for a shirt, and we took at the fitting issues I had with the original garment.
In this installment, I’ll discuss the fitting issues I’ve encountered and my attempts at solving them.
Armscye curve alignment with shoulder tip
Last time, we noted that the shoulders on the shirt were a bit too wide for my body.
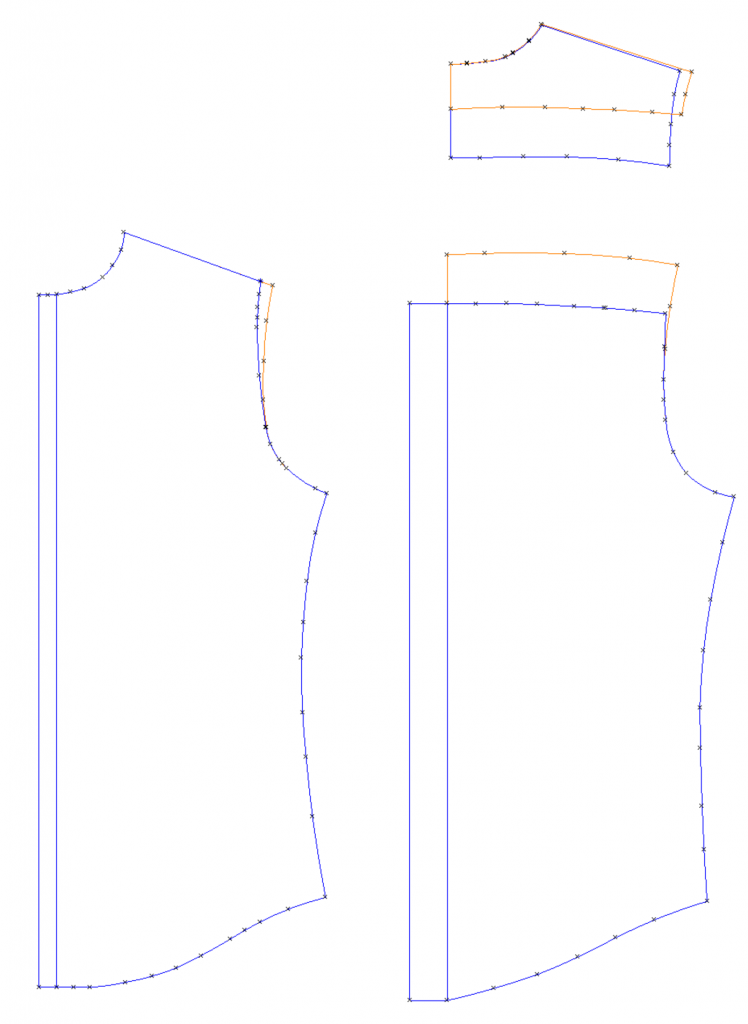
Starting with Muslin B, I brought the armscye curve in closer to the neck by about a half an inch. This causes the curve to line up right about at my shoulder tip. It’s a little different on right and left due to body asymmetry.
In this screenshot, Muslin A is in golden yellow, B is in blue. Front piece is on the left, back piece is on the right. You can see how I took in the shoulder point to match my shoulder width. (I also lowered the back/yoke seam by about 2 1/2 inches, more on that later).
Fabric puddling at arms in back
The fabric puddling on the back, right at the armscye, is caused by an armscye seam that is too far out (wide) for my body.
I clipped the armscye from the seam allowance to the stitching line to allow it to relax on the body as intended. To bring in the armscye curve, I snipped further into these clips, effectively taking in the back armscye seam. I snipped, deepening about 1/8 inch at a time, then tried the garment on for the camera.
The first round of armscye snipping happened with Muslin B. While evaluating Muslin E, I took in the back armscye curve some more. Again, the left side crumpled more than the right and the curve needed to be taken in further. I chose to fix the left side, hoping that it won’t be too far in for the right side when I try on Muslin F.
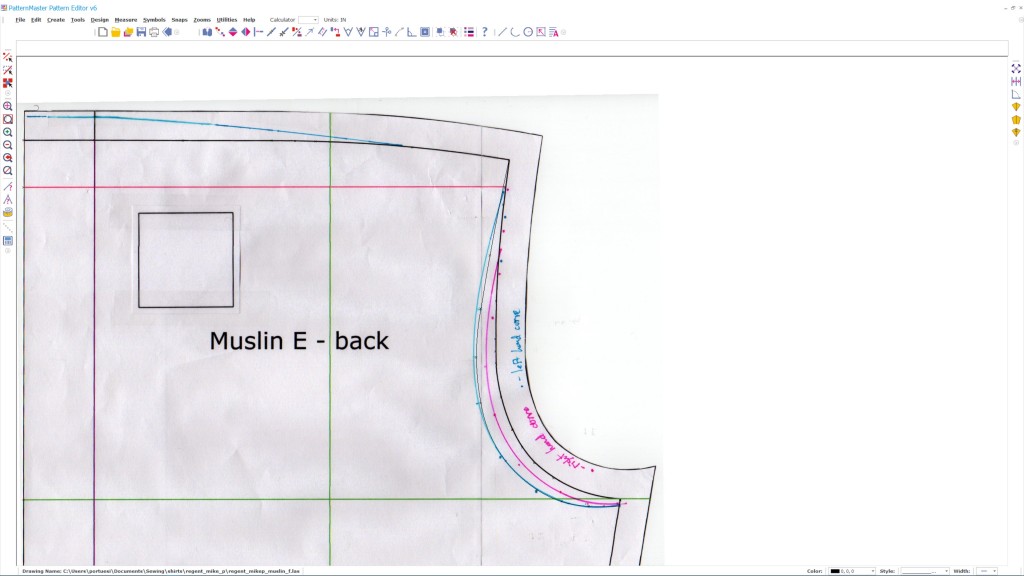
For this pattern alteration, I used a hybrid of handwork and digital work. I’m still feeling my way through this stuff, and experimenting to see what works and what doesn’t. In this screenshot, taken while drafting Muslin F, you can see that I’ve transferred the muslin markings back to the paper pattern, and drew in curves by hand with a marking pen. (Magenta line is for my right side, light blue for left side). I scanned the paper pattern, with its hand alterations, back into the computer. In Pattern Master, I overlaid the digital curves of the pattern atop the paper scan, and then traced new digital curves off the scan.
Compare the fabric puddling at the armscye in these two views.
Muslin B, Back View:
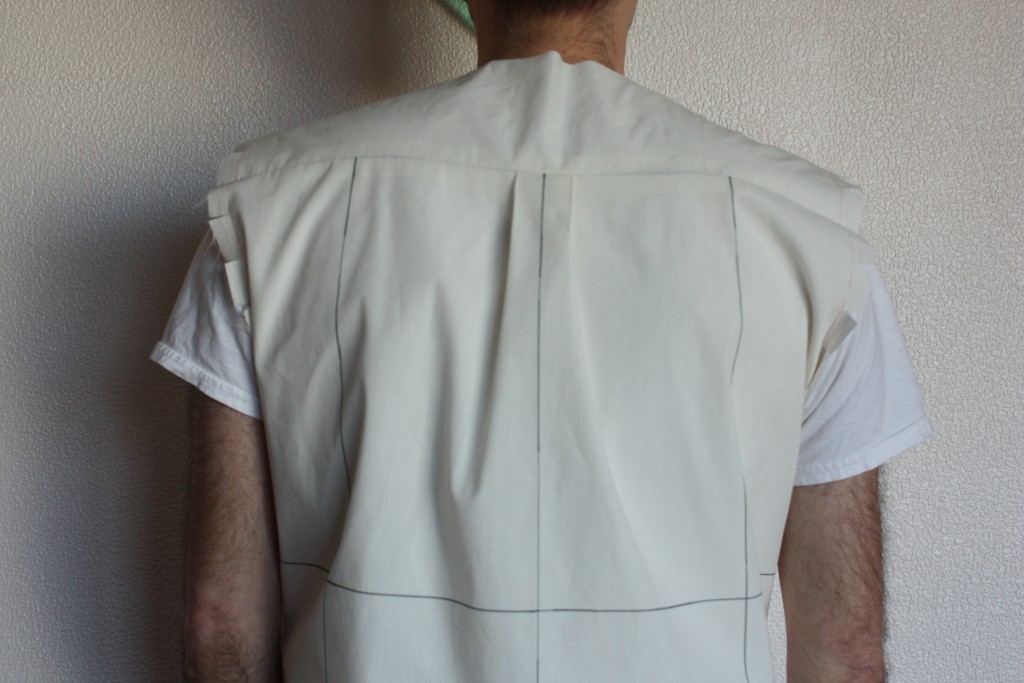
Muslin E, Back View, with armscye curves clipped
This photo is a prelude to Muslin F, which has been stitched up but not yet fitted as I type this. Especially on the left, you can see the clipping into the armscye curves. The new curves are the ones I scanned into Pattern Editor in the screenshot above.
Fabric puddling below neckline
The original muslin, without a collar attached, had a small amount of gaping at the base of the neck in back but was largely OK.
In Muslin B, I lowered the yoke seam as per DPC’s suggestion. That’s when a huge gap at the base of the neck appeared. Take a look at the back view of Muslin B again to see it.
Muslin B, Back View
This gaposis has been pretty difficult to treat.
Via the private forum for PatternReview’s Bodice Fitting class, I described the problem to Sarah Veblen. She suggested a pattern alteration that involved pinning out a dart on either side of the center back line, then transferring the dart to the yoke seam in an unusual way. I’m not going to describe the method here because it was a guess on her part (based on just a written description) and unfortunately, it didn’t work for me.
The idea to pin out two neck darts on either side of center back was still a good one, so I did that in the changes leading up to Muslin E. I pinned out the gap as darts on both sides, and also I raised the yoke seam so that the dart apex terminated at the yoke seam. It was then easy to transfer the dart to the yoke seam in a straightforward way, by pivoting out the dart.
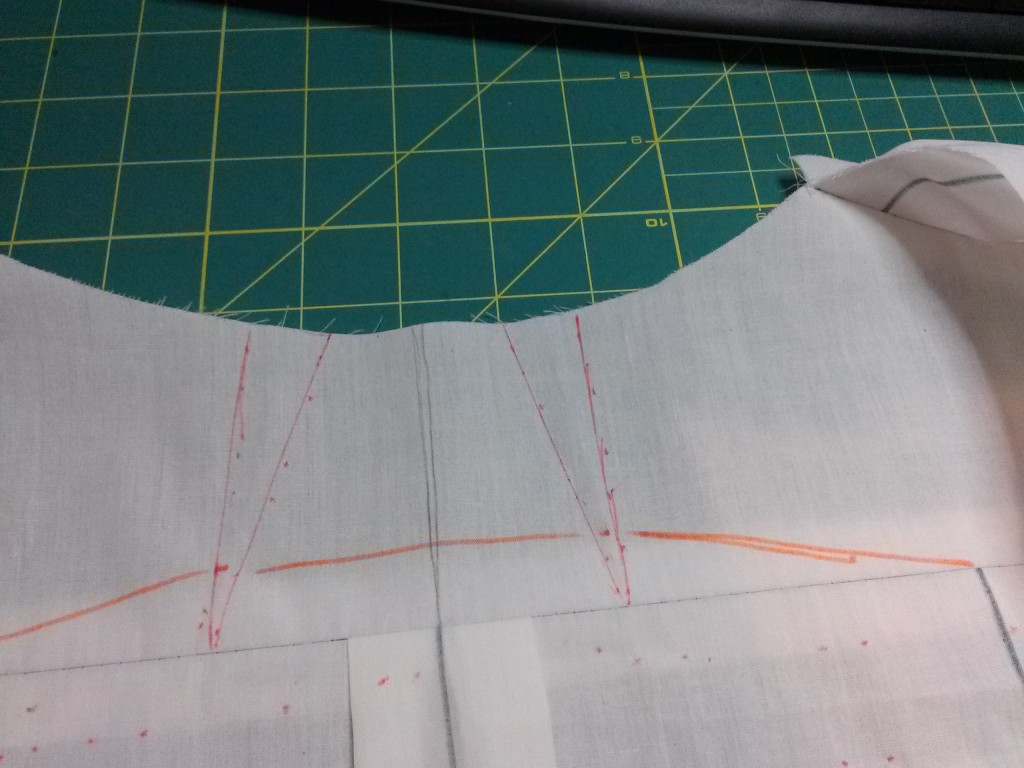
Here’s the darts I pinned out of the neckline on Muslin D. The pencil line is center back. Because the yoke pattern is symmetrical, I only need to take one of those darts out of the pattern piece.
Muslin D, Yoke
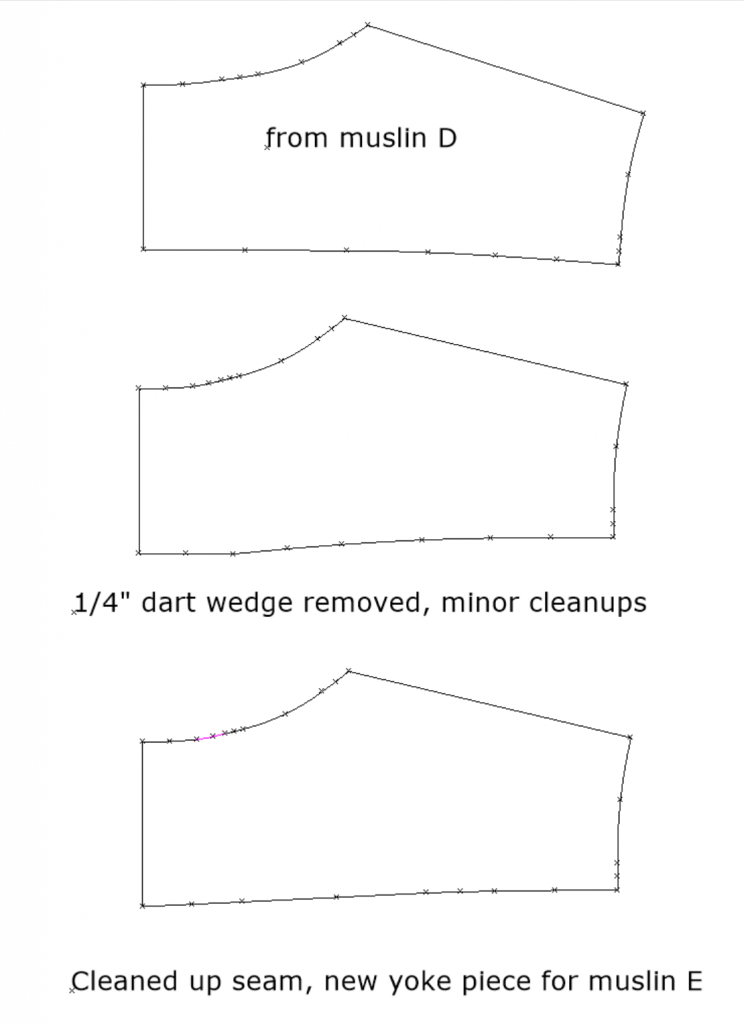
On the computer, I drew in the darts, then transferred the darts to the yoke seam and straightened up the yoke seam a bit. Here’s the process I followed.
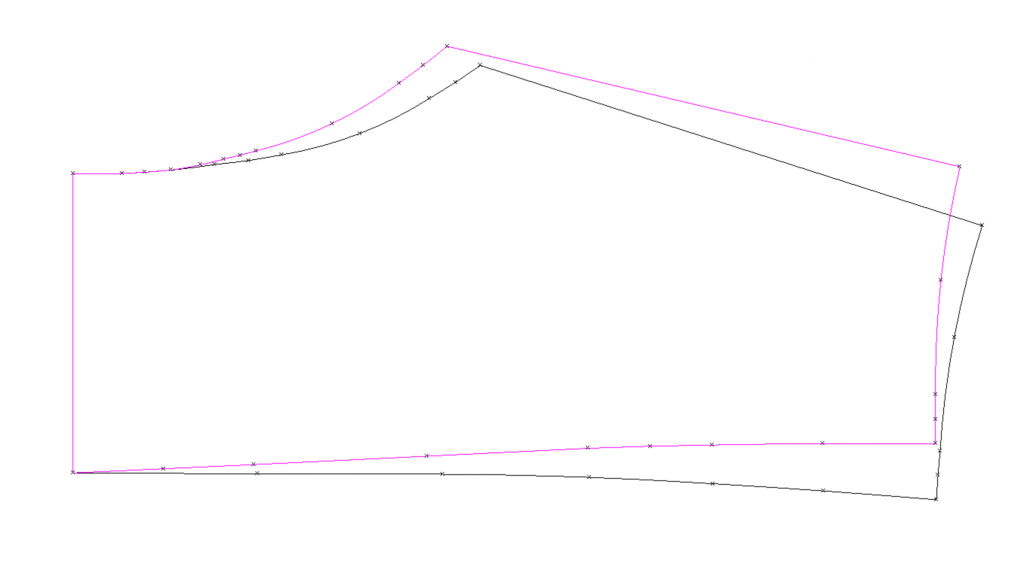
And here’s a comparison of completed pattern alteration on the yoke. In this screenshot the Muslin D version is in black and the altered version for Muslin E is in magenta.
The neck gaposis isn’t completely gone, but it is improved somewhat.
Muslin E, Back View
Part of the reason why the neck gap persists may be that I am also changing the shape and placement of the yoke seam on each muslin at the same time I’m updating the yoke to get rid of the gap. (See the next section, “That troublesome yoke seam”).
I haven’t made any change to Muslin F to address this issue. What I may do is turn the yoke from a one piece yoke into a split yoke. The split yoke would have a center back seam, which I could use to shape out the excess gap in the neckline.
That troublesome yoke seam
I began on Muslin B by lowering the yoke in back about 2 1/2 inches from its original location.
Apart the gaposis at the neckline in center back, moving the yoke seam down caused it to take on a strange shape. As the seam crossed the tops of the shoulder blades, it would “peak” at the tips of my blades before dipping down near center back. The seam now had a wavy, sinusoidal shape.
The back view of Muslin B shows it very clearly. Look at the yoke seam – it traces a letter “M” shape.
Muslin B, Back View
I think the basic problem was that I lowered the yoke seam too much. Given the problems I’ve had from lowering the yoke seam, I wish I hadn’t touched it at all. I do want to move the seam line down for style reasons, but I think I moved it too far down.
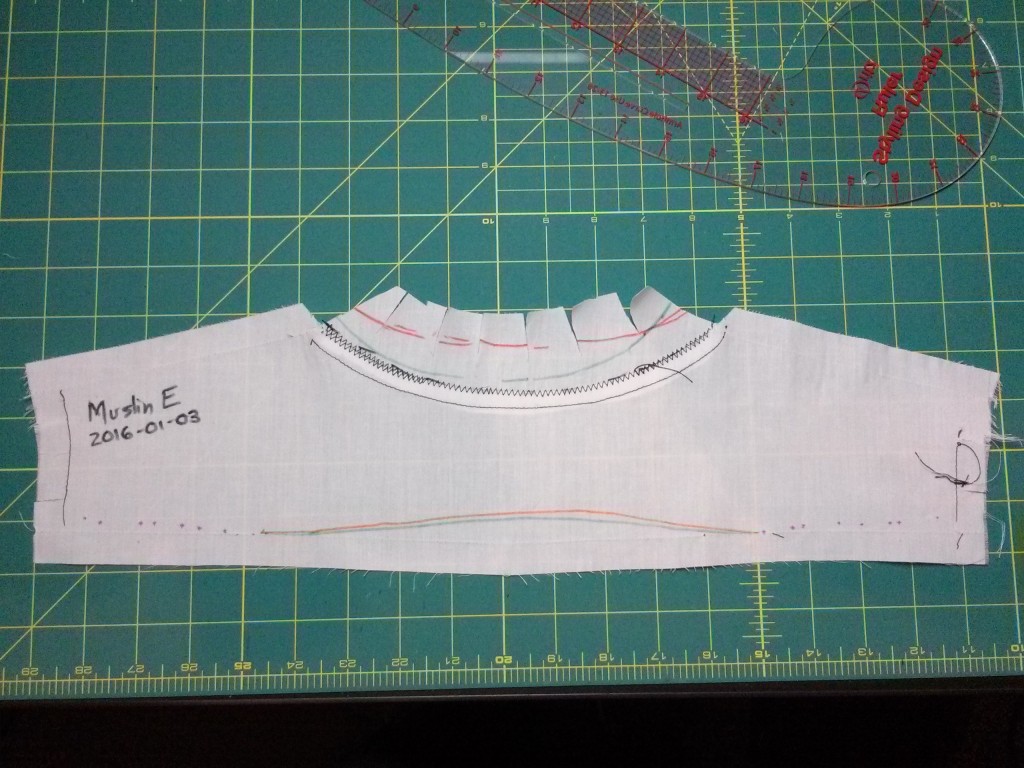
On Muslin D, I raised the yoke seam to clear the top of the shoulder blades, but not as high as before. Then on muslin E, I got my “assistant” to draw a horizontal line across the back, while the muslin was on me, to show what a visually straight yoke seam would look like on me. (green is along a straightedge, orange follows a shallow curve on the pattern ruler)
I took that back to the computer and altered the yoke and back seam lines to match.
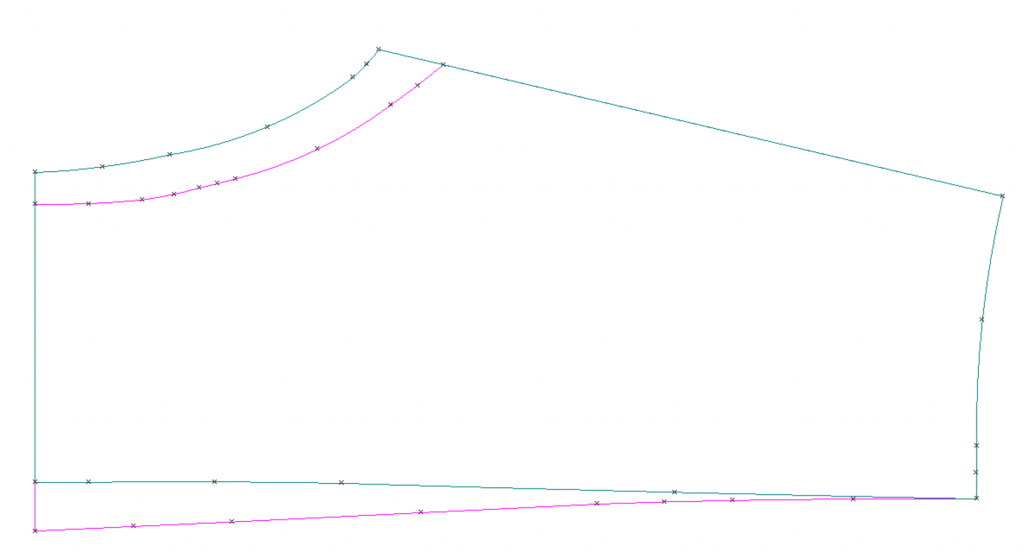
Here’s the completed pattern alteration. Magenta is Muslin E, Teal is Muslin F. (I’ve also moved up the neckline in Muslin F, which we’re about to discuss). There’s a corresponding alteration to the back piece (raising the seam line near center back) I’m not showing here.
Collar and Neckline
I wanted (or at least, thought I needed) to customize the neckline to match my own.
I took the trick from DPC’s Craftsy class of taking a long piece of cardboard (in my case, a 2-inch wide strip cut from a file folder), wrapped it around my neck at the desired circumference, and taped it together.
I used the “two finger” rule for men’s shirt collars – there should be enough ease that you can insert two fingers between the collar and your neck. With the cardboard circle around my neck, the place where the cardboard touched the muslin was the new neckline. (My “assistant” helped trace this out).
The neckline turned out too low. Without even putting an actual collar on the muslin, I could tell it was too large. Did I make the cardboard too loose? I’m not sure what went wrong here.
I tried again to fix this for Muslin F. I remeasured with the cardboard and redrew the curve. You can see the change I made in the teal line in the screenshot from last section. I’ll repeat it here.

In retrospect, this is another adjustment I probably should have left alone, but it has been educational.
Front/Back Balance
The horizontal balance lines between front and back are not level – when I stand, the shirt tilts towards the back. Here’s a side view of Muslin C, so you can see what I mean. The horizontal balance line that’s roughly at waist level tilts towards the back.
Muslin C, Side View
If I take a tuck of about an inch all the way across the back (pin out a half-inch fold), it helps level the balance lines and greatly improves the way the back of the garment hangs on my body.
For me, a question arises where one decides to take the tuck. I initially made the tuck way up high, close to the yoke seam, so as to affect the drape/hang of the fabric all the way down the back.
Taking a tuck at armscye level doesn’t affect the side seam, but it does make the back armscye curve about an inch shorter. Though I haven’t fitted a sleeve to this muslin yet, I am concerned about reducing arm mobility and I don’t know how that might affect things.
Alternatively, I could take the tuck farther down (say, just below the armscye). There it would not affect the armscye curve, but then I would have to adjust the side seams to keep them true.
Which way is better? I asked Sarah Veblen this question in the Pattern Review class forum. Her answer was simple: she basically tries more than one option for the tuck, and goes with the one that looks the best.
So for Muslin E, I tried out two variants of the tuck. One took the tuck up high, the other took the tuck at the side seam just under the armscye, at chest level. This was a bit of work because I actually made two muslins to do this bake off.
The high tuck was the winner of the bake-off. The back of the shirt hung nicer with the tuck up high at shoulder level, rather than at mid-chest level.
Muslin A, Back View

Muslin E, Back View
And the side view of Muslin E shows the horizontal balance lines to be roughly level from front to back.
Muslin E, Side View
Not dealt with yet
So here’s a small list of the things I haven’t dealt with yet.
- Strain lines at front shoulder. I haven’t been seeing this in the fitting muslins, but the original shirt does have some strain lines starting at shoulder tip and radiating downwards towards center front. This means my shoulders are slightly too square for the shirt, so the shirt may need a square shoulder adjustment.
- Ease around middle. The muslins are more snug around the middle, especially around the waist, than the original shirt. I think some circumference was lost at the seams when I traced the shirt onto paper. My plan is to add some ease to the side seams.
- Sleeve cap and Sleeve. I have seen Sarah Veblen’s instructions for drape-fitting a sleeve cap. But I am waiting to tackle this, until I have covered Sleeves in Paul Gallo’s pattern-making and draping course (which I will write about soon).
- Cuffs. Basically I have to draft new cuffs, as well as placket and pleat locations on the sleeve. Again, I’m hoping to get some direction from Paul Gallo’s course.
Next Time
I’m coming out of the closet.

Hi Michael,
Since you’re about to study under a real expert I won’t bother to describe (or reiterate) in any detail what I’d do in your situation except to say I think it’s a better idea not to have the side seams and armholes already cut and basted before fitting the shoulders; I’d not deal with the armholes and side seams at all until I liked the way the yoke was laying and the fronts and backs falling from it. …and did I really advise you to lower your yoke seam in back? Can’t recall doing that, but it doesn’t seem like such a good idea in these pix; I always look for the point or area where the back starts to drop vertically from the more or less horizontal plane of the shoulders, which in your case appears to be…just about two inches up from the lowered edge!
Looking forward to hearing about your class with Paul G.:) Hope it goes well!
David,
You didn’t advise lowering the yoke seam in back – but in the section on drape fitting, you gave advice as to locate the yoke seam around the transition point between back and shoulders. I don’t think it’s bad advice, BUT I chose badly when I relocated the seam, AND I’m not sure I really needed to relocate it in the first place (both of which you just pointed out!!).
The correction will work itself out as I move through making muslins. I’m doing one more try with Muslin F, and if that doesn’t show promise I’ll back up to the original yoke seam. Another alternative is to do a split yoke; by introducing a seam at center back I should be able to get rid of the gaposis once and for all.
But lowering the yoke was the biggest mistake I’ve made with my fitting muslins. On the other hand, it has been educational.
Nearly all of the fitting you see here was done in advance of my courses with Paul Gallo. He’s a great instructor and I’ll be writing about my experiences soon.
As always, I appreciate seeing your process. I wish I had your discipline, but I have to admit that it’s just not in my DNA! I’ll keep watching in hopes that some rubs off.
Mainelydad, you’re so kind. You just keep on cranking out one spectacular item after another while I futz around with dumpy-looking muslins.