Finally, the Chevron Latte Shirt is complete!
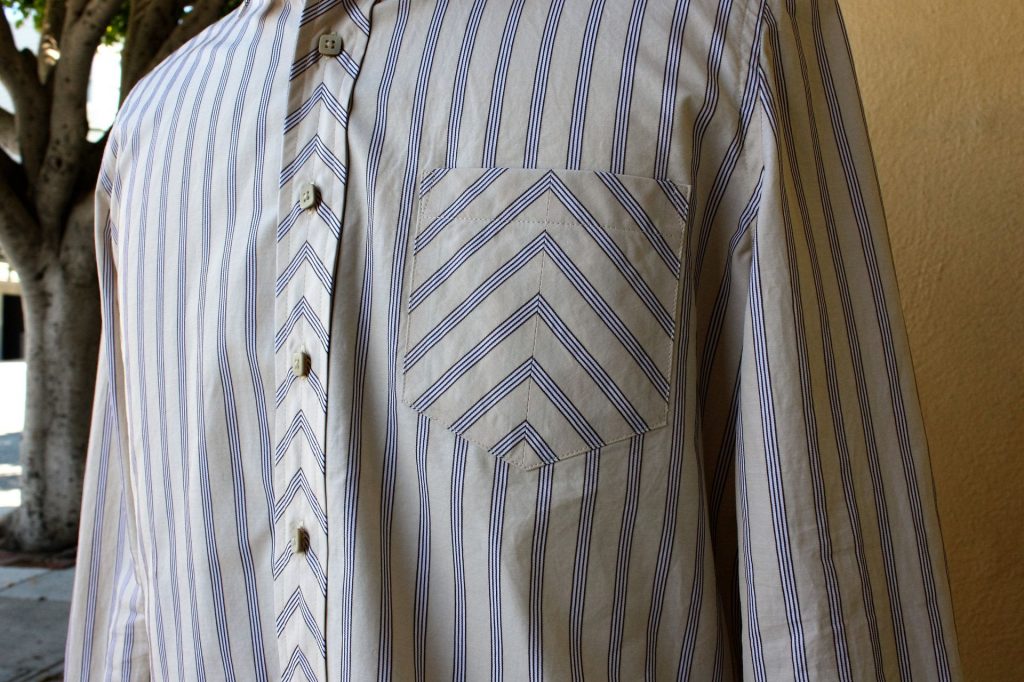
This shirt was a lot of work. Not only was the detail work intricate, but other items such as the collar, pocket and cuffs gave me problems during assembly – and as I covered in Part 2, the front pocket was a complete re-do.
(Click or tap for closeups of any of the photos).
Fronts
The pattern alterations worked well. The tightness across the front of the shirt is gone, and the shoulder slope adjustment has eliminated the drag lines from shoulder to chest. This photo does show a minor wrinkle line running from left shoulder to center front, but it’s more of a fluke the way the shirt was laying when the photo was taken.
The fit is especially good considering my shoulders are asymmetrical, and I will never get an exact fit without making what’s called a “complete pattern” – separate pattern pieces tailored for right and left. Truthfully, I don’t think I need to.

Closeup on the dress form. I’ve discovered that the better the shirt fits my body, the worse it fits on my dress form. Especially, my square shoulders don’t match the more sloped shoulders on the form. I’m considering a project to adapt the form to better match my body shape. Just shoulder pads on the form could help.

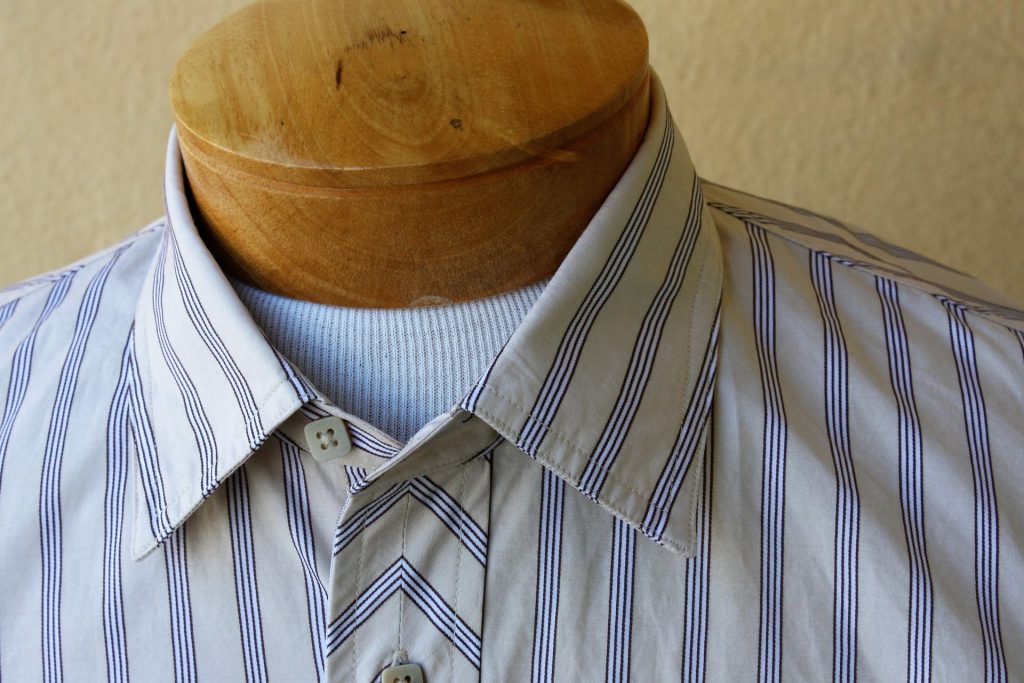
Collar
The collar fit also improved, with the lowered neckline and added ease both lessening the tension in the front. The front band also lays perfectly when the top collar button is buttoned; sorry for not getting a picture with the collar fully buttoned on me.
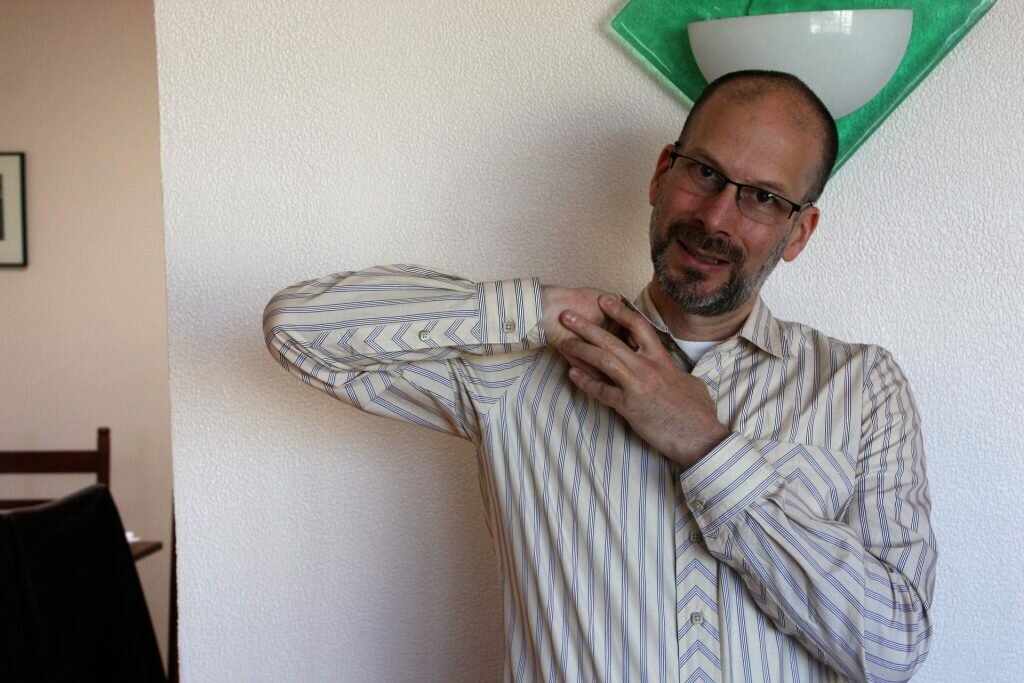
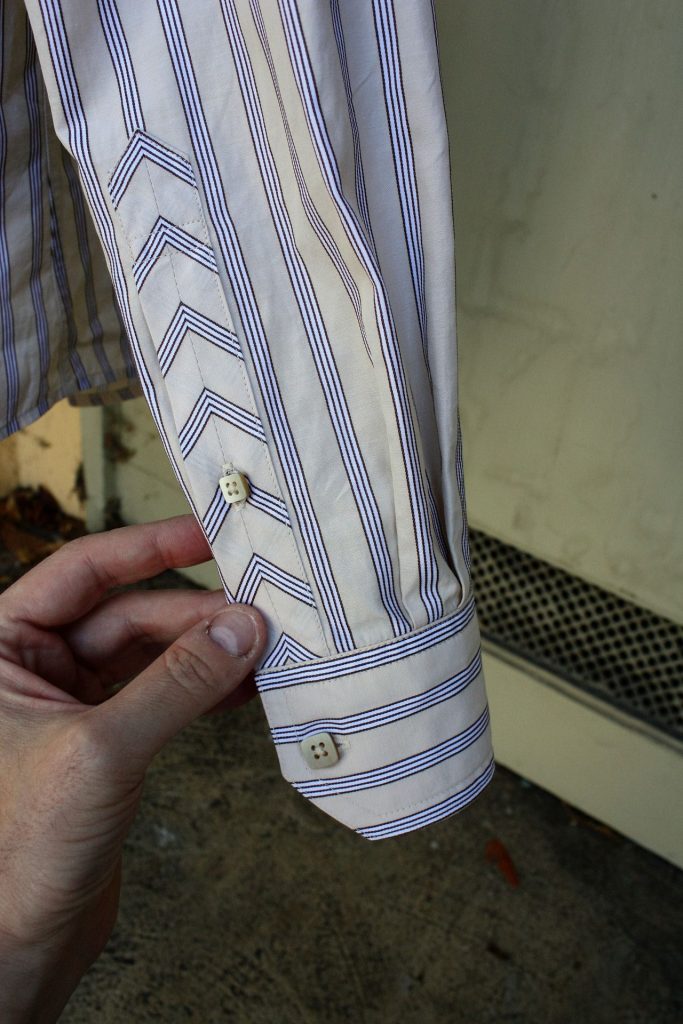
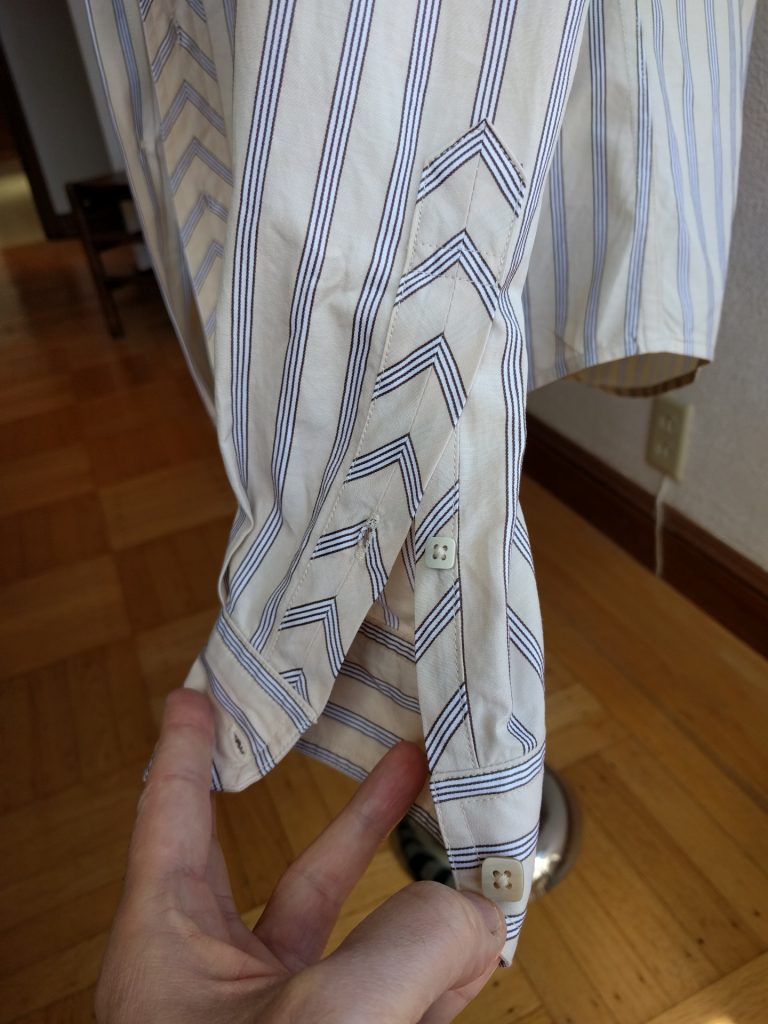
Sleeves
I got the effect I was looking for when I originally envisioned the chevron placket. I love it.
Back
Though I didn’t make any fit adjustments in the back, the fit here is also really good – which is good, because it means I didn’t screw it up. My partner Jim tells me the back looks way better than the earlier muslins I was playing around with.
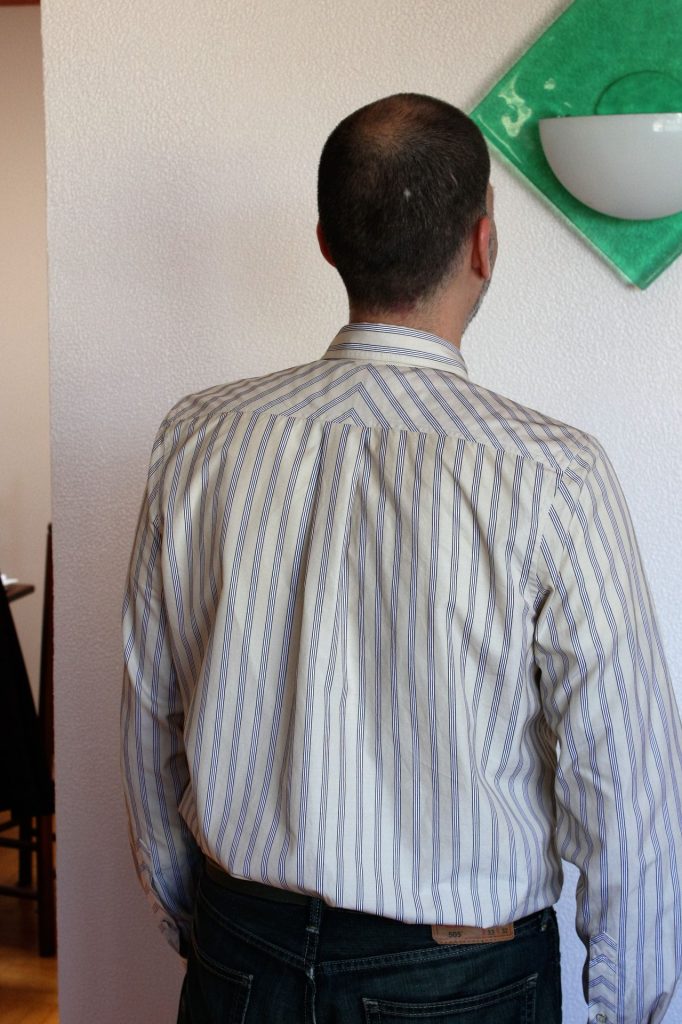
There is still some poofiness near the waistline; I’m learning from research that the poofiness may be a side effect of the extra ease afforded by the box pleat. There may be some opportunities to play both with different pleat/gathering styles, as well as back darts in future projects. I think back darts on this shirt would have looked very odd with the striped fabric.
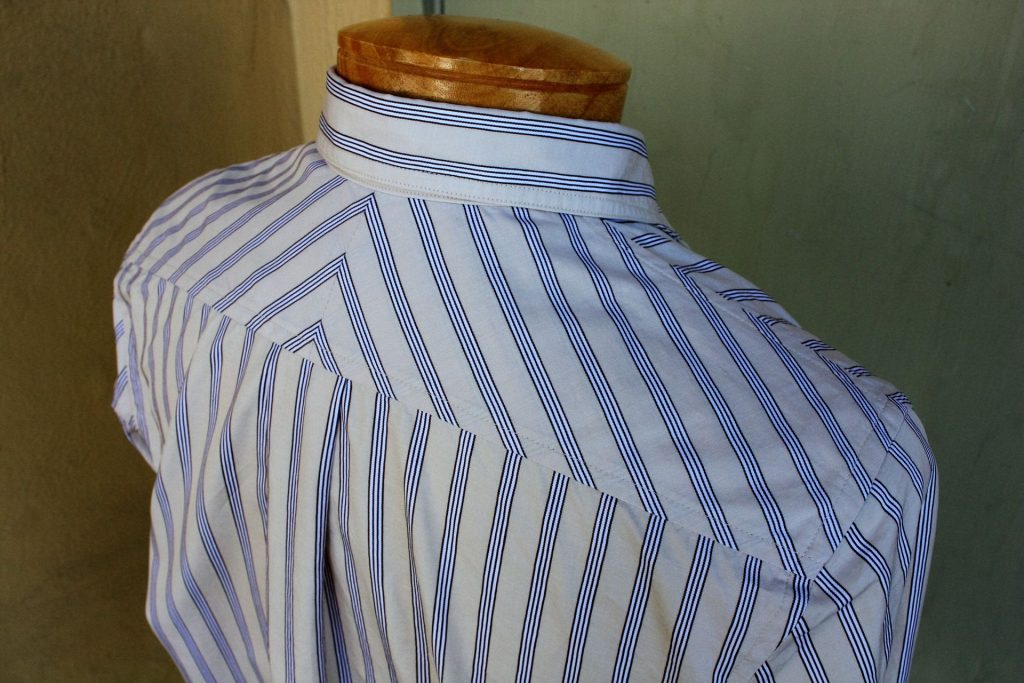
Here’s a closeup on the chevron back yoke.
Summary
I have no more fit changes I wish to make to the pattern.
I’m really happy with how everything came together for me on this project in terms of design, fit, and construction. I really plan to enjoy wearing this shirt.
Looks wonderful!
Stunning!. Top tier. You look really great in it.
Awesome! I love reading your posts. Keep up the good work. You must feel quite satisfied having a “finished” pattern.
Very Nice! Great buttons – the perfect choice.
Really, really nice. As for the back, have you tried side pleats instead of the center back pleat? I recently drafted a shirt with those, because they don’t add any width at the waist. I slashed from the top to the waist and squared to the side, before pivoting the amount of pleat take up. It worked well for the shirt I made.
I had never thought of that. Do you simply smooth out the side seam after the pivot? The pivot would make the side seam flare out near the armscye.
I do smooth it a bit so as not to have too acute an angle. The side seam does flare out above the waistline, but isn’t apparent once the pleat is folded in. I learned the method from a japanese sewing pattern.
Fantastisch!!!!!
Viele Grüße aus Deutschland.
Silke
WOW!
Your cuffs and plackets scream “fashion leader”!
Those square buttons are the icing on the cake (can one be smitten by buttons? To admit as much, might one end up on “Dr. Phil”, or a very special episode of “Sewing with Nancy”?).
LOL! I went back to Britex Fabrics yesterday wearing the shirt, so I could thank Maya the Button Lady for suggesting them.
Lovely job. I often remove box pleats to reduce fullness — I sometimes prefer a slim-fitting back. Another option is, of course, fish-eye darts, which can eliminate the poofiness entirely. But even as is, it’s a very cool shirt.
Thank you! I’ve been afraid to remove the box pleats because they will affect mobility at the shoulder. Because the sleeve cap is very high, the front-back arm reach is not generous. If I pull out the pleats entirely, I will likely have to add that ease back somewhere.
Simply a spectacular shirt. You must feel like a million bucks wearing it.
That is a marvelous shirt. I like how you used the chevrons on the sleeve plackets too. Great extra detail.
Your shirt got a very classical fit, it should not be to tight. Great work!
About the wrinkle on the photo. I think the shirt sticks to the t-shirt underneath and create wrinkles that isn’t there. I have seen that problem many times when fitting garments. Skip the t-shirt next time for the photo session.
Kristine, thanks for that insight on the photo, and also for the fit assessment!
Oh my, I am speechless. Lovely details, so impressed with the quality of your work. I am a sucker for buttons big, small, and unusual shapes.
I smell haute couture already. I did a box pleat muslin(my first), for a shirt inspired denim dress. Yours look really good. Congrats on a job well done.
Thanks for sharing
Josie
Lovely details on this shirt well done