Hi everyone. In today’s installment of the Chambray Comfy Shirt, I get the muslin put together and get it ready to fit on the subject.
The Extension Table
This project inaugurates a new sewing gadget. I purchased the Wide Table accessory for my sewing machine from Amazon.com. Judging from the Amazon reviews, this extension table seems to be popular with quilters, but maybe that’s because so many people quilt these days.
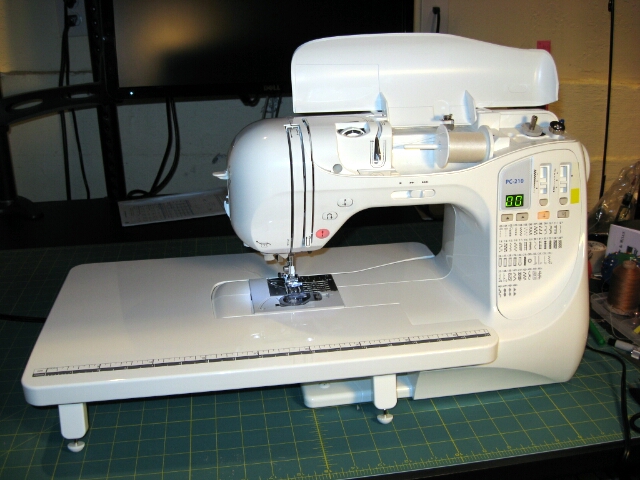
The motivation for purchasing the table comes from the Craftsy class, Sew Better, Sew Faster featuring Janet Pray. The table supports the fabric in the vicinity of the feed dogs, preventing it from drifting and pulling, which can distort seams. Additionally, the additional flat surface leading into the feed dogs allows you to better align the fabric and sew it without using pins.
Already it’s changing the way I sew, and I think for the better. I do feel like I have more control over the fabric, though it’s hard to tell because I’m still adapting to it. I might take the time to cut some strips of scrap fabric for practice, like Janet Pray suggests in the class video.
The Pattern
Typical for my first run with a new pattern, I traced and cut patterns without modification.
This pattern is typical of several Kwik Sew patterns, where all seam allowances are 1/4 inch, rather than the 5/8 inch normally seen in home sewing patterns.
That’s fine in most places, but when I sew the real project I will probably have to modify the pattern to add some seam allowance back to 5/8 inch on the sleeves, armscye and side seams. The extra seam allowance is to allow for flat-fell seams on the real shirt. Also, I want to expand the seam allowance where the yoke joins the back to 3/8 inch, so the line of topstitching in that area will be guaranteed to catch the seam allowance.
On the muslin, I simply chose to quick-finish the seam allowances along the sleeves, armscye and side seams using the overcast stitch on my conventional machine. (I didn’t feel like dragging out the serger, and I didn’t want to risk trimming the fabric with the serger blades on some of the curves).
The Muslin
I cut the bedsheet, trying to stay on the grain for all the pieces but not worrying about it too much. I’m also using some extremely cheap all-purpose polyester thread from Fabric Outlet. It leaves a lot of lint in the machine, so I won’t buy any more – but I hate letting things go to waste.
I also skipped interfacing altogether. This muslin really won’t be wearable.
I started out doing all the fiddly bits first- the collar, cuffs, sleeve placket, and patch pockets.
The Collar
Feeling so uber-confident from having done collars several times in the past, I stitched the collar together. It was only after I attached the collar to the collar stand that I realized something was wrong. The notches on the pieces didn’t match up, the edges didn’t ease properly, and the curve on the collar stand was messed up when I finished.
Then it hit me. I stitched the collar together backwards. I took the outer edge of the collar as the inner edge, and attached that to the collar stand. Ooops.
Top: edge-in collar. Bottom: the correct collar, redone.
I cut new pieces for collar and stand and had a little do-over.
The Cuffs
I stitched together the cuffs without incident. I did simple snips on the curves, rather than cutting out tiny wedges, following advice from Janet Pray’s class.
The Sleeve Placket
Kwik Sew 2000 has an oddly shaped sleeve placket pattern. I don’t like this pattern very much, as you must do a simple hem on the inside of the placket and it comes out looking a little cheap.
I did the plackets in a hurry, so they didn’t turn out great. I plan to substitute another placket pattern for the real shirt.
Patch Pockets
Instead of using the large pockets with curved corners, I instead stole the chevron-shaped pockets, including flaps, from McCall’s 6044. This was fun, since I had never done pocket flaps before.
The pocket flaps are entirely unnecessary for the muslin, but I wanted them to judge the style, positioning and sizing of the pockets before doing the final garment. Again, the flap isn’t interfaced, even though it is supposed to be. And I didn’t do the buttonhole on the flap.
Attach the flap with a single stitch above the pocket opening.
Trim seam allowance on the flap.
Topstitch the top of flap, enclosing seam allowance.
Sleeves and Side Seams
I still have to attach the collar to the shirt, attach cuffs to sleeves. Then I will be ready to sew up the sleeves and side seams and the muslin will be complete.
The Fitting?
Unfortunately, the project stops here for the moment. The boyfriend is currently in North Carolina visiting family, so this project is on hold for a week or so until he returns, and I can put it on him and do fitting. I did do a quick tryout with just the bodice before his departure, and I already know I have to narrow the shoulders.
The Contest
Finally, I have a few words about the PatternReview contests.
Originally, this project was inspired by the PatternReview Men’s Sewing Challenge, which ran from August 1 through 15. As a “challenge”, it wasn’t revealed to the forum members until late July. When I did hear about it, I was very excited and was one of the first to sign up for the contest.
Unfortunately, due to the very complicated work/career things going on in my life, I wasn’t really able to get started on the project until after August 1. And given the amount of work that goes into making a carefully-made men’s shirt, I wasn’t able to finish it in time for the deadline. So I didn’t enter my shirt in the contest.
This is the second PR contest for which I wasn’t able to finish in time. In some sense, it doesn’t matter; I do these projects for reasons other than competing in an online contest. And I realize that contests have to have deadlines, otherwise there would be no judging and there wouldn’t really be much of a competition.
But I feel the contests with two-week deadlines, and involved contests like the Wardrobe Contest which have you completing four coordinated garments in one month, are asking a bit much. I get enough of deadlines in other contexts, like my professional life. I don’t need them in sewing as well. This hobby is supposed to be enjoyment, not work.
So while I’m not going so far to say that I’m done with PR contests, I have to say that I’ll be more careful deciding if I want to enter them in the future.
Hi Micahel,
Thanks for sharing. I read your notes. I have a sewing machine that come with a table. I am not a quilter. Yet, I enjoy just the same. I love the way you do things. I am inpressed with your skills.
As for me, I have not enter any contest. I am busy enough with too many deadlines. You are right sewing suppose to be fun.
I have a limited time for sewing this week. I did a heart embroidery border yesterday to practice a satin stitch, something new to me. Now, I have a unique “mended heart” on a plain T- shirt. To celebrate my husband new and improve heart. Almost a year, after he had a heart valve(3) repairs, plus a closure of a Patent Foreman Ovale (PFO).
Thanks again for sharing. Your partner, sure will enjoy his new personalized shirt.
Again, thanks for sharing
Keep in touch
Josie
Keep up the good work Michael! Just came across your blog and realised we both started sewing around the same time (early 2012 for me). I like your detailed instructions and the way you share experiences, very clear!
I’m just finding your blog. Great work! Really, is there anything more under appreciated than a man’s shirt?? There’s more to it than meets the eye. The good news is that once you’ve got a basic pattern fitted, you can bang out all sorts of variations.
I didn’t get anything done in time for that contest either. I am just too slow and don’t plan things well. I am not against contests though — they can be fun — but I’m just not good on estimating how long it takes to do things. Once I get more experience I think I can do better at contests.
Matt, we can be inaugural members of the Slow Sewists Club for Men. I’m just glad I’m not doing this for a living!
Hey, just finding your blog. I love making menswear too, so it’s always fun to find a kindred spirit.
If you’re from an engineering backround, you would probably enjoy drafting patterns–custom fit, basic blocks you can manipulate however you like, freedom from the tyranny of weirdo commercial patterns…I don’t know, I have found it addictive anyway. :)
My machine, a pfaff from the 1970s, has a table like that (not quite as large) that’s removable. I find it very helpful, especially when felling that awkward armscye seam.
Scooter, I definitely plan to get into pattern drafting. I’ve slowly been accumulating the L-square, hip ruler, etc. and I have two patternmaking books so far. All in due time!
If you ever sew with your machine set into a table withthe “bed” level with the top of the table you’ll never want to sew with an extension table again. The only drawback? If you need to actually USE the freearm for say…sleeves? You have to remove the machine from the table. I use an old kitchen table that I cut a regtangle in with a jig saw & then built a 3 sided box under the hole & attached it to the underside of the table with “L” brackets. The box allows me to use multiple machines & to adjust the hieght of the machine to be level with the table top I use a high tech gadget….stacked magazines. I have clear acrylic extension tables for the majority of my machines, I remove the legs – snug it up to the machine bed & sew away! I have found though, that where the legs were attached to the extension tables that they stay in place better if I just put a drywall screw thru the holes & thru the table top. No – I didn’t cut up a perfectly good table, this one just happened to have a crack in the spot where I cut the hole! It sounds hoey, but it’s incredibly useful! You can probably see pictures of my hokey sewing table on my blog: http://samquilts.blogspot.com/2011/03/belle-meade-beginning.html
Sam
Sam,
I am afraid that if I used a sewing machine on a flatbed table, I probably wouldn’t go back. Thing is, there’s no space in my home for one. The worktable for my sewing machine is actually a desk that gets double duty for computer work. Unless I ditched the desk, that is… Hmmm…